A Common Error for First-Time Sitecore 9 Installations
Since Sitecore Symposium a few weeks ago, I've been installing Sitecore 9 locally in a variety of environments. Due to the additional complexity of Sitecore 9 installation via the Sitecore Installation Framework, I've encountered a few bumps and bruises. Some errors and issues more common than others (but trust me, all have led to great learning experiences). One of the most common issues is an odd database connection error while SIF is running the xConnect installation step:
Error: Could not deploy package.
Error: Unable to connect to master or target server 'sc90_Processing.Pools'. You must have a user with the same password in master or target server 'sc90_Processing.Pools'.
Error count: 1.
Error Code: ERROR_EXECUTING_METHOD
More Information: Could not deploy package.
Unable to connect to master or target server 'sc90_Processing.Pools'. You must have a user with the same password in master or target server 'sc90_Processing.Pools'.
	Learn more at: http://go.microsoft.com/fwlink/?LinkId=221672#ERROR_EXECUTING_METHOD.
Install-SitecoreConfiguration : Command C:\Program Files\iis\Microsoft Web Deploy V3\msdeploy.exe returned a non-zero exit code - (-1)
At C:\Users\perficient\Desktop\files\InstallSitecore9.ps1:47 char:1
+ Install-SitecoreConfiguration @xconnectParams -Verbose
+ ~~~~~~~~~~~~~~~~~~~~~~~~~~~~~~~~~~~~~~~~~~~~~~~~~~~~~~
	+ CategoryInfo          : NotSpecified: (:) [Write-Error], WriteErrorException
	+ FullyQualifiedErrorId : Microsoft.PowerShell.Commands.WriteErrorException,Install-SitecoreConfiguration

[TIME] 00:02:17
Transcript stopped, output file is C:\Users\perficient\Desktop\files\xconnect-xp0.171102.log
Invoke-CommandTask : Command C:\Program Files\iis\Microsoft Web Deploy V3\msdeploy.exe returned a non-zero exit code - (-1)
At C:\Program Files\WindowsPowerShell\Modules\SitecoreInstallFramework\1.0.2\Public\Tasks\Invoke-WebDeployTask.ps1:36 char:2
+     Invoke-CommandTask -Path $Path -Arguments $msdeployArgs -TaskName ...
+     ~~~~~~~~~~~~~~~~~~~~~~~~~~~~~~~~~~~~~~~~~~~~~~~~~~~~~~~~~~~~~~~~~
	+ CategoryInfo          : NotSpecified: (:) [Write-Error], WriteErrorException
	+ FullyQualifiedErrorId : Microsoft.PowerShell.Commands.WriteErrorException,Invoke-CommandTask
Despite a lot of text about users and passwords, the key message to take away from that error is actually in line 2: unable to connect to master or target server.
Possible Solutions
In short, the xConnect setup script is failing to connect to SQL Server. A few things to review with your SQL Server setup and connections:
Make sure SQL Server is running
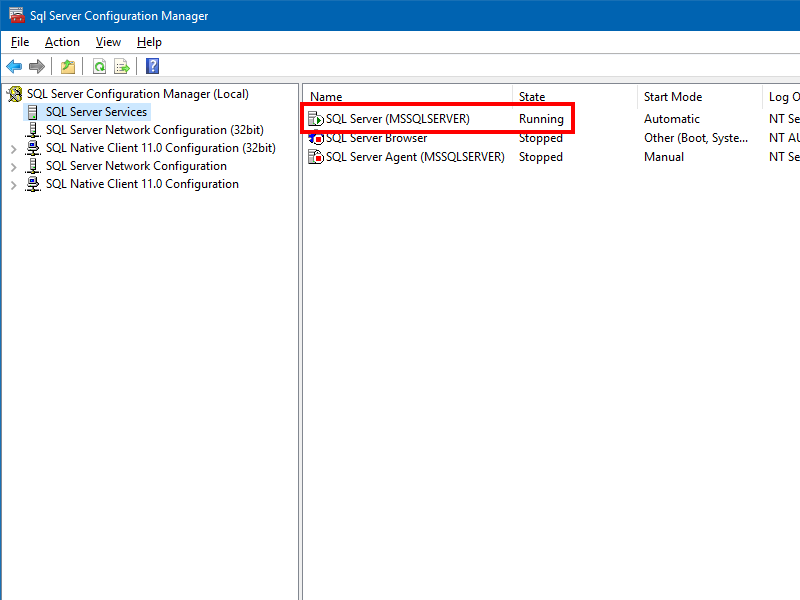
Use SQL Server Configuration Manager to check the status of the SQL Server service.
Quite simply, check to be sure the SQL Server Windows service is running. This is done by opening the SQL Server Configuration Manager, then clicking on SQL Server Services in the left pane. The "State" should be Running.
Use the correct SQL Server connection name
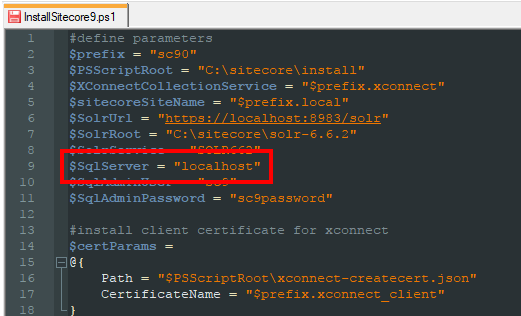
SQL server name will typically be "localhost" or your computer name.
Several variables at the top of the SIF installation script relate to database connection info, one variable being the name of the local SQL Server instance. Are you connecting to a local instance of SQL Server? More likely than not, you'll just need $SqlServer set to "localhost" - but you may need to adjust this based on your server configuration.
Double-check SQL Server username/password
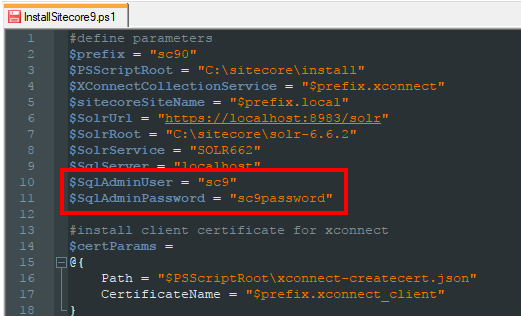
The variables $SqlAdmin and $SqlAdminPassword in the SIF installation script should match up to the SQL Server 'sa' user or a user with the same admin-level permissions. Make sure the username and passwords you enter here are correct. Verify they are accurate by connecting to SQL Server with the same credentials in SQL Server Management Studio or using sqlcmd.
Update! (February 13, 2018)
Thanks to the efforts of a few co-workers (including newly-minted Sitecore MVP Wendy Derstine), I want to call out a potential issue with passwords and strings in PowerShell. Remember to be mindful of using special characters in your password. The biggest offender is the dollar sign ($).
PowerShell has two types of strings: literal (utilizing single quotes - '') and interpreted (utilizing double quotes - ""). Literal strings are just that. Interpreted strings allow for variable replacement, which is where the dollar sign comes into play:
#
# Literal - single quotes - prints: $firstName Bruno
#

Write-Host '$firstName Bruno'

#
# Interpreted - double quotes - prints: Brandon Bruno
#

$firstName = "Brandon"
Write-Host "$firstName Bruno"
Any passwords used in the SIF installation scripts should be in string literals ('') or escaped properly when using interpreted strings (""). To escape characters - such as the dollar sign - use a backtick (`).
A correct example of each:
# Double quotes with escaping
$sqlAdminPassword = "my`$securePassword!"

# Single quotes as a literal
$sqlAdminPassword = 'my$securePassword!'
SQL Server user needs correct server role
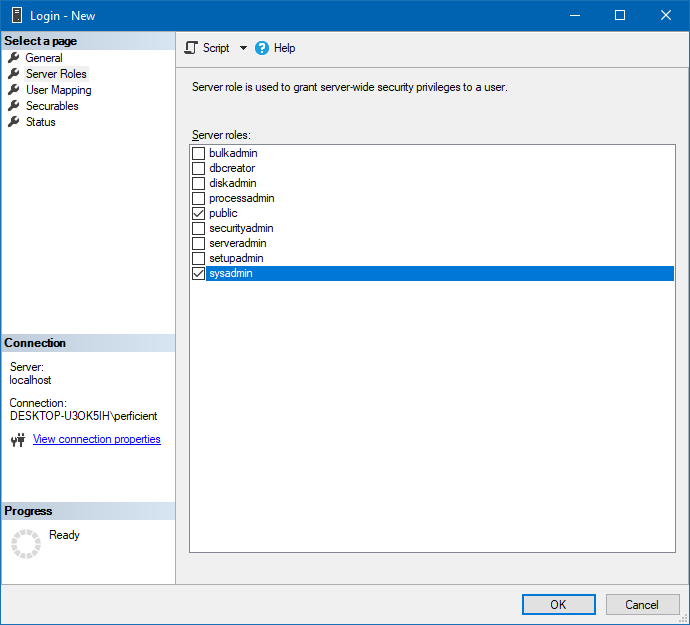
Any user with the 'sysadmin' role will work for SIF.
SIF needs a SQL Server user with admin permissions. This can either be the default 'sa' user or - as with previous Sitecore installations - a separate user with the 'sysadmin' role. This is only for the installation process - once Sitecore is up and running in higher environments, you should still harden this user for security purposes.
Enable Mixed Mode Authenication.
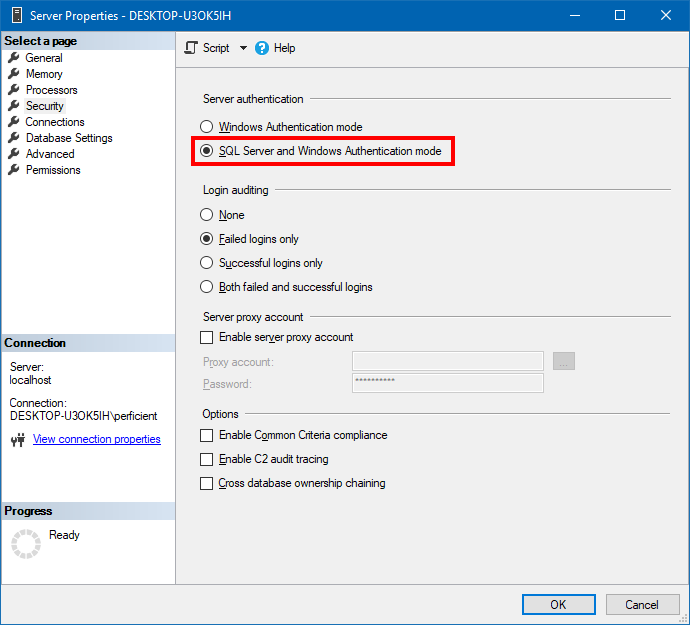
"Mixed mode auth" allows both Windows Authentication and SQL users to log on to the server.
If you just upgraded to or installed SQL Server 2016 or 2017 for Sitecore 9, its likely that the server authentication mode is set to Windows Authentication (unless you configured it differently during the installation). In order for SQL Server users to connect, "mixed mode" authentication must be enabled. Do this by right-clicking on your server name in SQL Server Management Studio, selecting "Properties," then choosing the "Security" tab, as seen above. Select SQL Server and Windows Authentication mode.